I played with iPhoto 6 this weekend, in probably the most detail since I got it. It leaves me conflicted.
The problem comes from timing. I’d been using iPhoto for years, since I bought my first digital camera. It’s never been the most powerful tool, but it was the most flexible. I got this most recent version of iPhoto when I bought my new laptop this spring. But the new computer triggered several things. I’d also been waiting for a new computer with a DVD burner, so I could switch to shooting in RAW format. (RAW files are just too big to easily backup to CDs.) So now I had the new computer, and started shooting in RAW. And conveniently enough, the new version of iPhoto was the first one to handle RAW files.
But…
I really don’t like the way it works. The first time you edit a RAW photo in iPhoto, it resaves it as a JPEG. (First rule: always preserve the original file). And from then on, you’re always resaving off that JPEG. But that means if you want to make non-destructive changes to your image, you have to start over again from scratch. And even if you’re willing to do that, iPhoto has never been the most efficient piece of software in the world. 2 or 3 copies of each photo can really add up.
So I stopped using iPhoto. I found a system that worked better for me.
Original photo:

But playing around this weekend, I found they had made a few improvements in iPhoto that really would have made my life so much easier. Just being able to adjust the temperature and tint (essentially white-balancing) is amazingly handy. And it works right on JPEGs, which I don’t think even Photoshop does natively.
First Draft, c. 4/06:

So I used the few photos I still had floating around in iPhoto as test files. Color correction mostly. I’ve always been obsessed with color, like and half-decent designer. But I’ve only been white-balancing my still camera for about the last 6 months. So I have plenty of orange photos laying around. My basic color correcting would fix the worst of the color casts, usually. The above picture was a first pass at correcting, from last spring; (though admittedly not my most detailed). Some of the orange has been removed. There’s a bit more contrast. Nothing serious. That is how the image was posted at the time.
Current Draft:
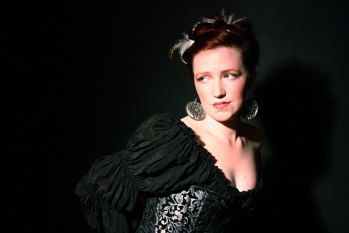
But with the new version of iPhoto, and it’s finer level of control, this is what I got. It really just blows away the last proof. All of the color cast is gone. The black in the dress is incredibly rich. And the decorations on the corset practically sparkle. And with a little bit of sharpening, which iPhoto handles amazingly well, the whole thing just pops. It’s really incredible what you can now do in iPhoto.
iPhoto. Which I don’t use any more.
Poo.
(Disclaimer: Yes the photo is blown out, because the lighting at the shoot was too blown out for my setup. And yes, she has incredibly pale skin in real life as well. Probably not the best person to be shooting in a black dress against a dark backdrop.)
Really makes me want to go back and clean up that whole shoot, though.